There is a Right Way to shoot…
Going to the gun range in the Wildlife Management Area or the local chirt-pit is always an interesting experience. You never know what you’ll see. Sometimes you see Military veterans who are an excellent marksman with their long-distance rifles. Sometimes you see older men teaching their grandchildren with .22’s putting holes in pumpkins. And sometimes you see good ol’ boys having a great time shooting shotgun casings off of the fence post. Everyone I have met there is passionate about gun safety, conservation, proper land management, and our constitutional freedoms. But something I have learned from watching his vast array of people – proper shooting technique is critical if you want to shoot well.
We have all seen the YouTube videos of people getting knocked down when they shoot a gun. This is all because the shooter didn’t know what they what they were doing. They are using improper shooting technique, so the force of the felt recoil knocks them off balance. This doesn’t have to happen.
I love to watch trick shooting competitions. Gerry Michalek makes it look so easy. Watching the competitions is not only awe-inspiring, but it is highly educational. I can’t do much yet, but I can shoot the Annie Oakley Trick (standing backward, shooting over your shoulder, holding a hand mirror) with a .22 revolver. One day I’ll be able to do more. Until then, I’ll keep on reading articles about technique, watching the Great Marksmen, and practicing.
Please keep in mind, these recommendations are for target shooting, not necessarily the same tactics used in defensive situations. I can’t recommend enough the value of defensive shooting training. If you carry to protect your loved ones, get the training. It’s an invaluable tool that can keep your loved ones safe when every second counts.
Safety First
Always assume the gun is loaded. Everyone needs to be taught gun safety – even children. Never point the gun at anything you are not willing to shoot; make sure the muzzle is pointed in a safe direction. Never put your finger on the trigger until your ready to shoot.
Keep your eyes and ears protected. Always.
While practicing the correct grip and stance – its best to go ahead and be standing at the range and facing downrange. Make sure the gun is empty. Remove the magazine – no, it’s not a “clip” – and pull back the slide a few times to ensure that the chamber is empty. Lock the slide open and reinsert an empty magazine. Release the slide so that it can go forward. Now you’re ready to dry fire!

Body Position
Breathing is one of the most underutilized aspects of shooting. Learning to breathe slowly, and deep. Timing your breath with your heartbeat and at the stillest moment in your body, pull the trigger. That respiratory pause is a moment when your chest muscles are completely relaxed. Remember, tension anywhere but your wrists and hands will ruin accuracy. Some trainers will tell pistol shooters to inhale as they raise their pistol to the target, hold their breath as they squeeze the trigger, and exhale during the follow through. I’ve tried both, but I prefer shooting during the natural respiratory pause – this method will carry over rifle shooting, shotgun, and archery.
There are three main standing shooting stances, the Isosceles, the Weaver and the Modified Weaver. From what I’ve seen in competition shooting, most of “the Greats” use the Isosceles. You should stand comfortably, your shoulders relaxed. You won’t shoot well being really stiff or tense in your shoulders. Keep your arms fully extended, when possible, but not locked.
Some trainers will tell you to stand a little sideways with one leg way out in front of you – but you will actually hinder yourself if you do this. It limits your range of motion. Stand squarely facing your target. One foot can be slightly in front, but not much. Keep your feet about shoulder-width apart. Your knees can bend just a little – don’t let them lock up.


Your shoulders need to be forward. Its a fairly natural stance. Don’t hunch your shoulders up or duct your head down. Stay relaxed and lean forward slightly. Keep them in front of your hips. Never lean backward. Shooting properly with a pistol requires you to stand slightly leaning forward. Your weight has to have a forward bias in order to counteract the felt recoil. If the felt recoil throws off your balance, lean forward a smidgen more. This allows you to have more control over the gun, to prevent muzzle rise, and to get back on target.
You’ll want to bring the gun up to your dominant eye. Don’t turn your head. This needs to be as natural and automatic of a stance as possible. If you don’t bring the gun up to your dominant eye, you’ll hunch your shoulders or tilt your head – and that’s altogether just too much movement.
A Firm Grip
Proper grip is key to making sure the muzzle stays pointed at the target. The more upwards rise in your muzzle, the more time it takes to get back on target. Also, if your muzzle rises while your bullet is still exiting the barrel, it will throw off your accuracy.
The grip is another one of those areas that a great many shooters will disagree with. Judging from experience as well as from listening to numerous YouTube interviews of competition shooters – some grip techniques are better than others.
Keep both hands on your gun. This will give you tighter groupings as you have more control over the gun. Don’t use your non-dominant hand to brace your wrist, or hold the bottom of your gun grip – that’s called Teacupping and it serves absolutely no purpose at all. Your non-dominant hand serves as a vital stabilizer. If your non-dominant hand is not pretty tired from a long day on the range, you’re not using it enough.


Make sure the center of the frame of your gun lines up along the center of your arm – along with the Ulna bone. This helps the recoil to be centrally and directly back so that it is more easily managed and you stay on target better.
Your non-dominant hand is to cover as much as the exposed area of the side of the grip as possible. This is very important. Recoil moves along the path of least resistant – so the more control you have over the movement of your gun, the less felt recoil and the more accurate you will shoot. Your non-dominant hand is slightly more forward on the gun than your dominant hand.
Your elbows need to be relaxed, but not floppy. Not locked either. They need to be secure. Hold your pistol with a very firm grip – a little stronger than a good strong handshake. This is not a death grip. There is no need in holding it so tight that your hand shakes. A firm grip reduces the amount of movement your non-trigger fingers will have – which is better for accuracy.
Your wrists need to be locked over center, and you press inward with both hands holding your gun in place. Like Gerry Michalek says, “Don’t noodle” – the front of your gun can’t wobble. You need to be aware of, and in such control of each movement, your gun makes that it is like an extension of your hand. This comes from pressing from your wrists to hold the gun firmly on target. It feels awkward at first – keeping very firmly on center without tensing up in your arms and shoulders.

You’ll want your thumbs to be on the same side as your non-dominant hand. Your thumbs will point generally towards the target. They don’t really do much, just sit over there out of the way. Your non-dominant fingers have a bit of wiggle room too. They can be over or under the trigger guard – this preference can vary between the way various pistols fit your hand. Whichever one ensures you have a solid grip, one that allows you to naturally hold the gun on target. Do keep your thumbs still – if you tend to rotate your thumb as you pull the trigger, it will cause you to miss your target in the direction you rotate your thumb. This grip error is called thumbing.


Grip your gun so that the webbing between your thumb and trigger finger is as high up on the grip as possible. The lower in your hand the action sits, the more straight back into your arm the felt recoil will travel. This helps to control muzzle travel and reduces the snappiness of felt recoil. This interesting rule of physics is one of the main thoughts behind the design of the pistol called the Rhino. Ugly gun – but great engineering.
Aligning Your Sights
“Aim small, miss small” is the mantra my Grandaddy said when he was teaching me to shoot. Don’t just aim for the large red bulls-eye. Look at the center speck in that bullseye. Aim for that.

Sight Alignment is dependant upon your firearm being properly sighted in. If you are shooting really tight groupings at the 5- yard line, but then at the 20-yard line they are significantly off center – it may be wise to talk to your local gunsmith.
Just to clarify, sight alignment is simply the relationship between the front and rear sights of the handgun. If the top of your front sight is not perfectly level with the top of your rear sight, then you will be shooting either too high or too low. And if your front sight does not have an equal amount of air-space on either side showing through, then you will be shooting to the left or right of your target.
These two variables lined up correctly creates an accurate Sight Picture. If you are shooting and the target is just littered with holes and you really can’t tell what you’re doing wrong – your probably focusing too much on the target instead of the front sight. When you are focused on the front sight, the rear sight and the target will be slightly blurred. This blurring of the target throws off a lot of new shooters.
Pulling the Trigger
Pulling the trigger is different from mashing or squeezing the trigger. A controlled, deliberate, methodical, straight back pull is what you need to do. If you mash or squeeze, you will move your gun and throw off your sight picture.

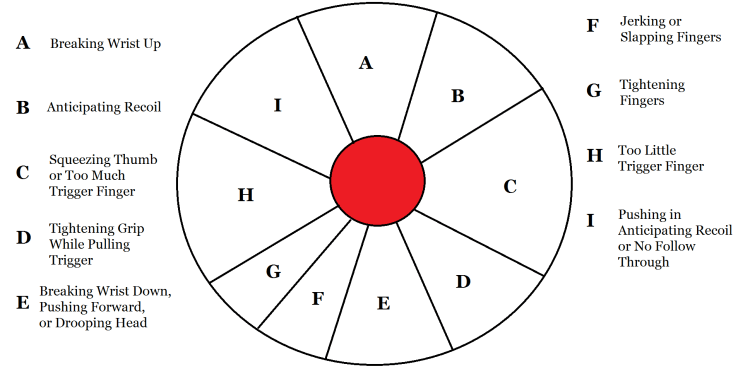
You will need the center part of your index finger to be centrally on the trigger. Not the tip. Not the first knuckle as shown in the photo above. The padding directly under your nail bed is what needs to be centrally on the trigger, which is parallel to the gun’s frame. This portion of your finger is called the Distal Phalanx. If you are off center, your gun will pull to the left or right.
If too much of your finger is on the trigger, it’s called snatching. It will cause you to hit to the side of your target. If you’re right-handed, you will hit to the right of your target. If too little of your finger is on the trigger, it’s called pushing. This will cause you to hit to the other side of your target. Another common issue is heeling. This is when you squeeze the bottom of the grip too hard as you depress the trigger, sending it slightly forward. This will cause you to hit slightly above your target.
Don’t anticipate the recoil. Allow yourself to be surprised by the sound of the gun firing. If you anticipate the recoil, your front sight will drop as you depress the trigger. Stay focused on your front sight as you depress the trigger.
Follow Through
Follow through is critical. It is what allows the projectile to completely exit the muzzle, and remain faithfully on target. It is allowing the bullet to exit the muzzle – a pause after you pull the trigger. You maintain sight picture during follow through. Any jerking motions can cause the muzzle to shift as the bullet is exiting and throw off your accuracy.
It is hard to know if you have any subtle movements – so having a friend stand just outside of your arch of peripheral vision and watch you is helpful. If our friend notices that you have to readjust your gun back into position instead of the gun falling into a natural point of aim.
Trigger reset is what happens when after a shot is fired, the slide has slid back, the spent cartridge ejected, the slide comes forward, a new round is chambered and the trigger moves back to the front. On many firearms, the trigger may not have to go all the way forward in order for it to be reset and ready to fire. Some Glocks reset just shy of being all the way forward, you’ll know it when you feel it click.
If you hold your finger just forward of the reset, you’ll have a shorter trigger pull and can fire off the next round much faster – and in competition shooting, timing is crucial. Dry firing will help you learn where your trigger break is.
Follow through allows you to be ready to accurately fire a follow-up shot. You are already on target and don’t have to waste valuable seconds correcting your sight picture. This is vital to not only competition shooting, but for self-defense purposes. It is impractical to anticipate that ONE single shot will stop whoever is attacking you. You have to be diligent and prepared – and a big part of that is correct follow through.
Conclusion
When shooting, keep it simple. It all boils down to remain relaxed, have a proper sight picture, pull the trigger, and follow through.
So why not head on over to your local gun range and practice? Practice is the only way to improve! Don’t just shoot to burn through ammo – make a conscious effort to make each motion be deliberate, each shot a learning experience.